In the lesson Perspective part 1 chapter 3 ‘On the road’ I assumed a road with symmetrical walls (image above). In this chapter I will show you how you can make other choices when creating a view. In any case, you can start with random vanishing lines instead of the standard road or the geometric tile floor. The only rule is that all lines that actually run in the same direction come together in one vanishing point on the horizon. The vanishing point is like a black hole in the distance that swallows everything.
Random vanishing lines to one vanishing point
With random flight lines you can come up with all sorts of things, such as the objects floating in the sky.
Notice the placement of the three standing figures in the middle of the fantasy drawing. It is the same way as in exercise 2 of the previous chapter, only this time without having to draw an entire tile floor first.
I will show you once again how to build a perspective drawing with one vanishing point.
Exercise 1: construct a perspective drawing by following the next steps.
Step 1: Draw two lines on the ground converging in one vanishing point on the horizon. It could be a road, a canal or the floor of an endless corridor. Choose a point on one of the flight lines and draw a vertical line from there that extends well above the horizon. The length of the vertical line determines the height of a wall, building or other object.
Step 2: Draw a perspective line from the top of the vertical line to the vanishing point. Now it seems like an endless wall. The thickness of the wall you are looking at should be drawn horizontally. Add some figures at eye level, with their feet along another perspective line.
Step 3: Divide the endless wall with vertical lines into smaller blocks/buildings. This way you get streets for example. Determine the thickness of the wall/blocks. Add a few giant lollipops, with both their top and bottom along new flight lines. The giant lollipops can of course also be simplified trees or lampposts.
Step 4: draw some windows if you like. The top and bottom edges of the windows again run towards the vanishing point.
Step 5: Finish your drawing off with shadow and/or color and maybe a fineliner. In my example, all (except one) cast shadows on the ground run along the same line of flight.
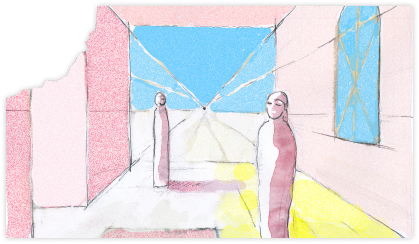
The next sketch is a semi-open space with two figures both at eye level, one closer and one further away. Again, it was not necessary to make an entire tile floor first. A horizon, a vanishing point and a few perspective construction lines are enough. The construction lines are still clearly visible.
PERSPECTIVE FORSHORTENING
Suppose you look at a ruler straight from the front, at its full length, and you will clearly see that the ten centimeters are the same size. If you see the ruler in perspective, the back centimeters become smaller and smaller (image). In perspective, surfaces are shown foreshortened.
If we see a window perspectively shortened and not straight from the front, the back half is further away than the front half and therefore becomes slightly smaller/narrower in the drawing. In such a case you can find the center with the help of two diagonals. In the following drawings I will show you how that works. This way you can easily find the center of each plane in perspective. Also useful for a pointed arch window or a pointed roof.
Exercise 2: draw a round arch and pointed arch window (possibly mirrored) and a house with a pointed roof in perspective. For the original ‘horizontal’ lines you need a vanishing point in perspective to the right or left of the window/house.
Arched windwo from the front
Arched window, pointed arched window (like in Gothic cathedrals) and gabled roof in perspective
Of course, foreshortening does not only apply to straight rectangular objects. For example, faces or figures that we do not see straight on will also become foreshortened in perspective.
Exercise 3: Suppose you want to draw a fence with vertical bars that are always the same distance apart, or a wall that is divided into equal parts. In these cases, you can use a geometric drawing trick. Look at the following drawing and perform steps 1 to 7:
Step 1: draw a horizon with a road and a fence with the top and bottom running to a vanishing point on the horizon (in my example left from the center).
Step 2: measure the middle of the height of the fence (here indicated by 1/2) at the front right on the edge of the frame.
Step 3: draw a line through the middle (1/2) of the fence to the vanishing point.
Step 4: choose the distance between the first two vertical bars by eye (top right the distance between A and A1). Step 5: draw a line from A down through the intersection of the 1/2 line and the second bar
Step 6: where the line touches the bottom of the fence (and the road) (here indicated by B), that is where the third bar will be placed (vertical).
Step 7: do the same from A1 to B1 etc. etc.
TIP: On the left in the drawing I have drawn the bars ‘freehand’. It also gives a good sense of depth, although it is not geometrically correct. For architecture though I recommend the use of a ruler. In general, I draw lighter and vaguer further away, that reinforces the depth effect.
In the drawing above, the vanishing point is a little bit to the left of the center. In the last drawing from this chapter below, it is all the way to the right. Vanishing points can even be outside the edge of the frame. More about that in chapter 4.
EXTRA: Try to create a space (inside or outside) using perspective lines in the direction of a vanishing point on the horizon. You don’t have to construct a tile floor first. Start drawing lightly with a well-sharpened pencil and use a ruler.